Coin color:
Texture Opacity
Texture Blend Mode
Apply
Feel free to share
 Using this site means trees will be planted. ^.^
(Find out more)
This coin creator will allow you to create all sorts of coins with relative ease and with a variety of customization options ranging from the color of the coin to the emblems upon them and how they are presented, as well as various text options and a whole bunch more. Perfect to be able to toss a coin in whichever universe you're creating.
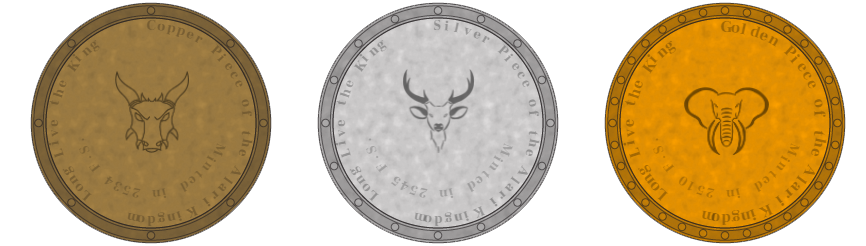
I've also focused on making sure there are borders with progressively elaborate details to offer ways to further distinguish the differences in value of a copper, silver and gold piece, for example. So let's delve right into the instructions first, or you could skip them and head straight down and just mess around with everything.
Coin color: Simply click on the colored square and pick your chosen color. As soon as you've selected one, the color of the coin will update automatically.
Texture opacity: There are a variety of textures you can select from the texture section. With this option you can change their opacity (between 0 and 100) to change how visible the texture is, giving a wider range of appearances.
Texture blend mode: Those of you familiar with image editing programs will recognize these options, but what they essentially do is change how the texture is rendered. They're too complex to explain fully, but essentially each mode takes the value of the texture and does math with it based on the pixels below it to display a different color dictated by that math. It's easiest to just mess around with them and see what you end up with.
Adding: Simply clicking on any of the images in the icon tab will automatically add it to the canvas. You can then drag it around as desired.
Adding custom image: By entering an url in the custom image input field and clicking add, your image will automatically be added to the canvas. Note that the url has to be an online url (meaning your image has to be uploaded somewhere). Entering a link to an image in a folder on your computer doesn't work.
Deleting: Selecting a piece (click on it) and then clicking "Delete Selected" will remove it. "Delete All" will clear the canvas of all icons.
Rotate: Entering a value (0-360) and then clicking apply will rotate the selected icon.
Opacity: Entering a value (0-100) and then clicking apply will change the opacity of the selected icon.
Blend mode: Like with the textures, using this changes how a selected icon is rendered. With icons you'll see the biggest changes, especially if you use custom images with colors rather than the default black and white ones.
Placements: Depending on the coin shape you've chosen, different placements for the text will be available. Selected Inner and Outer for round coins, for example, will offer you ways to add text in 2 different places on the round coins.
Text color: Like picking a coin color, simply click the square, pick a color, and it'll automatically update the text to the desired color. Clicking apply also works when changes are made to the text and you need to reset the color.
Texture opacity: Entering a value (0-100) and then clicking apply will change the opacity of the currently selected text placement. Changing the value also applies it automatically.
Font family: Selecting a font family from the list and clicking apply will change the font family of the currently selected text placement.
Custom fonts: (See below).
Text size: This changes the font size of the coin text. The default value is 14.
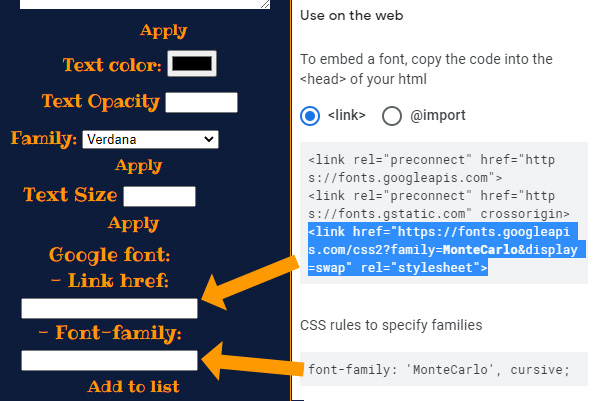
You can also use Google fonts to spice up the writing on each coin as well. Simply go to Google fonts (found here), select the font you like, copy the third link href (highlighted in image below) in the link href field in the tool below, then the font family in the font family field, click 'Add to list', then select it in the family dropdown menu, and click 'apply'. Easy peasy.
If you wish to save your work, you can take a screenshot of the canvas itself. On both windows and mac you can take a screenshot of just part of the screen as follows:
- Windows: Open the snipping tool (comes with windows vista, 7, 8, and 10) and drag the crosshair across the the canvas, you can now save the image with the same tool. If you have an older version you'll have to press 'alt' and 'prt src', and then paste the image in paint or another program to edit out the rest of the screen.
- Mac: Press 'command' + 'shift' + '4' and then drag the crosshair across the canvas. Once you release the mouse button the image will automatically be saved to a folder, which is usually the desktop or default image folder.
- Mobile devices: It really depends on the brand and type of device, so you'll probably have to Google it for your specific device.