Feel free to share
 Using this site means trees will be planted. ^.^
(Find out more)
World building guide part 1: Shaping the world
Building a world from scratch, whether for a game, a story or something else completely, can be a difficult task. There are a lot of things a world needs to make it look and feel natural and before you can even add those elements there are a lot of things to take into consideration.
In this guide I will aim to help you build a world of your own. What kind of world will be up to you. It could be something as small as a kingdom or something enormous, like a continent or a whole planet.
No matter the size of your world, the way to build it is usually the same. Larger projects simply have a few more steps or a few repeated steps here and there, but in essence it's all the same.
Since there are so many aspects to world building and since it's easier to digest it all in small chunks, I've split up the guide in 3 parts. In this first part we're starting at the very beginning, in a way we're going to lay down the foundations first, before moving on to adding the finer details.
Plan it out.
When you start to create a world it's best to have a rough idea of what you want. You don't need to know the finer details of what you want in your world just yet, but the overall shape is a great start.
The easiest way to illustrate all of this is by providing you with an example, so I will be building a rough world in this guide. I will be doing by using the map creator, so you can follow my steps easier.
For your own planning you could use my tool as well or you could use a different method, like sketching out ideas on paper for example.
First things first, the land itself. Since I'm creating a continent of sorts, it'll be surrounded by water, but obviously it won't look the same all around, a continent is far too large for that. So, how will the shorelines look? What kind of shores will there be? Will there be white sandy beaches or jagged rocks and steep cliffs?
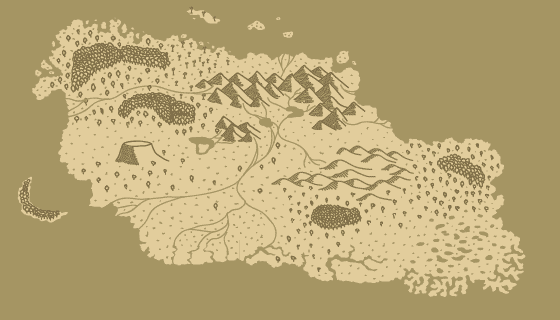
I've figured out what I want, so I created it in the map creator and below is an image of the result:

My process
So that image looks nice and all, but what is my interpretation of it? Well, my thought process behind it all was as follows:
Northwest
I knew I wanted a rough, stormy area on my continent. I chose the Northwestern part. The sea will be wild and clash against the rocks, so there will be parts of the land which have come loose from the main continent. They could be eroded little islands or they could be huge pillars broken away from the cliffs, that's not all that important just yet.
I've got the rough shape of what I want down, I have a climate in mind and applied it to the lands and I will keep that climate in mind when moving on to the next parts.
Northeast
I want the Northeast to be calmer. While keeping in mind that the Northwest has a rough climate, I decided to curve the lands toward the South. I did this as a way of sheltering the East from the rough and cold waters of the West. If you want to be really precise you might want to think about ocean currents, but this is generally not all that important for most world building projects.
To further add a division between East and West I'm thinking about adding a mountain range between the two. I knew I wanted one before I started and this is starting to look like the ideal place, but adding mountains is a step I'll do later. But it's good to keep such things in mind.
Southeast
While the Northwest is a wild and cold region, the Southeast will be the opposite. The relative calmness of the Northeast will continue toward the South where it'll be hotter. I haven't decided on whether I want a damp, murky marshland or a gorgeous mangrove region, but I know I want it to be very wet, so I reflect that in my map creation in the Southeastern most corner.
At this point I make a somewhat bigger decision in terms of whether I want there to be a marsh or mangrove. Since I thought about having a mountain range in the Northeast I could have rivers flow toward the South. But I decide against this, I want the rivers to lead toward the Southwest in order to give that land its own distinct look as well. So the Southeast will become a mangrove, at least once I've finished this initial planning phase.
Southwest
So I've pretty much already decided I want the Southwest to be a land full of rivers. While thinking about it more I realize this will work really well, the Northwest and its stormy weather will supply the mountains in the Northeast with rain or snow, which will flow into the rivers going to the Southwest.
So the initial planning phase is completed. I have a general idea of what I want, everything makes (enough) sense and I'm ready to move on to the next phase.
Natural elements
It's time for the next phase, which is to roughly add the natural elements. We're sticking to the big elements, like mountains, forests, rivers, lakes and hills. The details of those will be worked out later. It's easier to add them first and then check to see how they'd affect each other, rather than adding them with full details and realizing it won't work well together.
To illustrate my thought process I will be using an image again, as seen below.
My thought process
In the initial planning you've seen I already had a good idea of what I wanted. Most of this stayed the same, as you can see on the image above. There's a mountain range in the Northeast with rivers flowing toward the Southwest. There's a (very rough) mangrove-like area in the Southeast and there are huge forests in the Northwest, which will add to the wild atmosphere of that area.
I added a few more elements, like the large hill area which will block rivers from running from the Northeast toward the mangroves. This also adds to the isolation of the Northeast and it makes the Southeast look more remote.
I've added lakes near the mountain ranges, this happens in nature so it makes sense to add them and it is also a great element for potential stories.
The biggest feature I added is the mountain in the West. It's mostly a story driven addition, as it could be a spiritual place or an ideal place for a stronghold.
So phase 2 is complete as well. We've got a world. It's still very basic and lifeless, but we got our foundations. Hopefully you were able to follow my thought process and hopefully it'll help you with planning out your world as well. But we're not done yet, far from it in fact. Let's move on to adding details.
Adding more depth
I mean this in a literal way. We need more height and depth in our world. While it won't make a huge impact, choosing where the high and low areas are helps making your world unique and it can be used for story purposes as well. Will the two armies meet on an open field or in a hilly area? Will merchants travel across roads which keep going up and down due to the landscape? Will the city be build alongside a cliff or on a lonely peak? A little height can make a big difference, not just in your world, but also in your story.
In the case of my world I want there to be cliffs in the Northwest. It's a rough land and adding cliffs would just add to that roughness. The fields to the Southwest will be flat, this means the rivers will flow gently and that lonely mountain will be visible for miles.
The mangroves of the Southeast are in a flat area as well, but the terrain gets rougher and more even the further you venture from the shores. The Northeast will obviously be uneven due to the mountain range.
Some 'special' elements you might want to consider in terms of adding height and depth are: waterfalls, caverns, cliffs, fjords, (very) deep lakes, volcanoes, crags and ravines.
Weather
I will touch on this briefly now and go into more detail in part 3, but try to think about weather patterns already. Now that we've added depth to the world, the weather patterns will form as well. Obviously it's all fictional, so they don't have to be natural weather patterns, but if you want them to be it's good to consider it now.
In the case of my map we've already established the Northwest will be stormy and rough. This weather will travel toward the East where it will climb the mountains and cover the lands in snow.
The mangroves will be hot and damp, so rain will have to fall there at least once in a while. The same goes for the Southwest. The rivers will provide plenty of water to this area, but there will be remnants of the Northern storms which make it to these Southern lands.
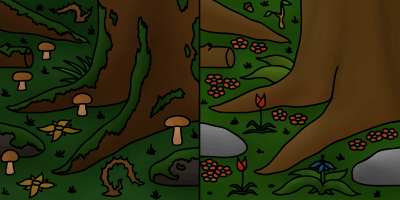
Effects on nature
We've added depth, we've added rough weather patterns and we've figured out some basic climates for the regions of our world. All of these will have an impact on what kind of nature will live in those areas. While it's still entirely up to you how nature will look from an aesthetic point of view, it's still important think about what types of trees, flowers and other plants would realistically grow in each region.
So going back to my world example it would be roughly as follows:
The Northwest will have strong trees with deep roots in order to survive the strong winds. Plants and shrubs would be small, but resilient and able to survive in harsh conditions. Leaves on trees and plants would be fairly small to avoid being ripped to pieces by gusts of wind.
The Northeast wouldn't have much plant life at all. A few dozen species of flowers and shrubs and maybe a dozen or so species of small trees, but these mountain ranges are too high, cold and isolated to support a very varied ecosystem.
The Southeast will have an abundance of life in many colors, shapes and sizes. It's a mangrove after all.
The Southwest will have plenty of variation, but most of it will be in the form of fields of flowers, small shrubs and bushes and a decent variety of trees, some of which grow alongside the rivers, others which grow further away.
In the next part of this guide we'll add more details to our world. But hopefully I helped you plan out your world and thinking more about what makes each area unique. The same types of forests, mountains and fields across the globe would make for a dull and unrealistic world after all.