Feel free to share
 Using this site means trees will be planted. ^.^
(Find out more)
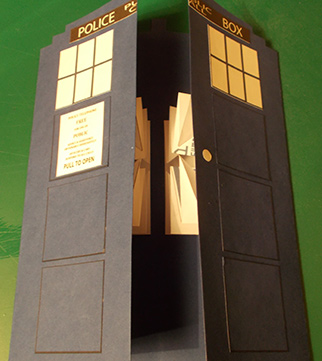
Making an expanding Dr. Who Tardis card.
As mentioned in the expanding cards guide, I created a Dr. Who Tardis card with these expandable contraptions. If you haven't read that guide yet, you might want to do so now, as this guide assumes you know how to fold them. It doesn't take long though, so don't worry.
But, as mentioned in that guide as well, there's so much more you can do with these expanding contraptions, especially for geeky purposes. From Pokeball cards to fantasy maps, and from loot bags to gate-like cards. But enough about that, let's create a Dr. Who Tardis card. Allons-y!
Parental guidance: Use of scissors/hobby knife.
Difficulty: Easy.
Time: 30+ minutes
Cost: Cheap.
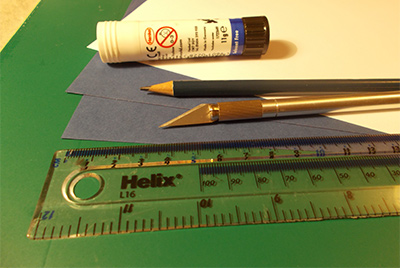
Materials: 2 blue A4 papers, 2 white A4 papers, glue, pencil, scissors or hobby knife and cutting mat, ruler, printer or drawing utensils.
Optional materials: Printed/written text, pictures or whatever else you wish to be on the inside of the card. Hole puncher.
Instructions
First, create a clean working space for you to work in. Then create all the graphics you want to be on the tardis. This could be as "complex" as creating everything on your own, or as simple as printing out a picture of a tardis, cutting out the right pieces, and using those later.
For this tardis card I used one full sized, blue A4 to create the main body, but you can of course go smaller or bigger if you wish. This does mean the measurements won't be exactly like the real tardis in any of its versions. If this is important to you, make sure to do some measuring with a reference photo.
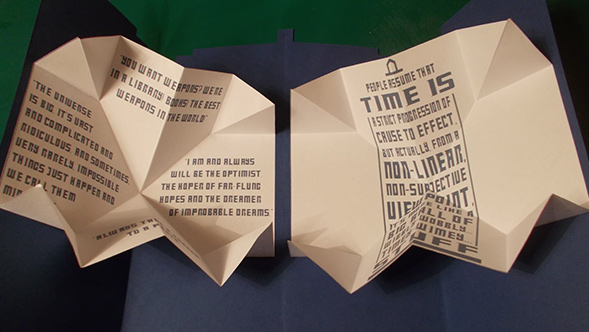
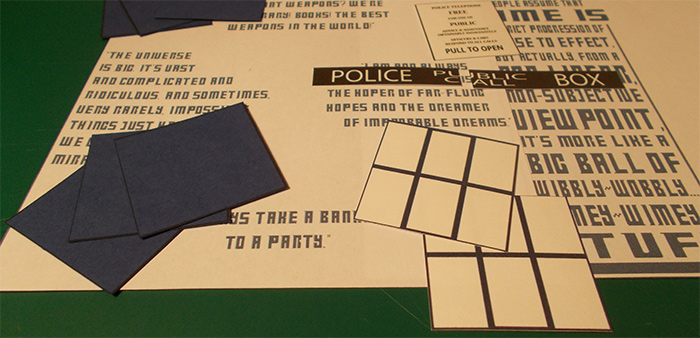
I printed out 6 blue squares on a different blue A4, and the "Police Public Call Box" sign, the "Pull to Open" sign, and two frames for the glowing windows on an A4. I also printed text I want to be on the inside of the folding contraptions on a separate A4 (see tips in the expanding cards guide for the how and why), cut those out with a hobby knife, and folded them to create the expandable contraptions.
I also used a hole puncher to create a white circle for the keyhole. It's a little big, but I prefer this clean look over whatever tiny, messy, somewhat-circular shape I might've been able to cut instead.
Note: There are two folding doors for this card, which meant the maximum size of a folding contraption when folded completely can be a quarter of the length of an A4 piece of paper, or half the size of an A4 when it's in its folded out state. Remember, it's better to have a square piece of paper, so cut as needed.
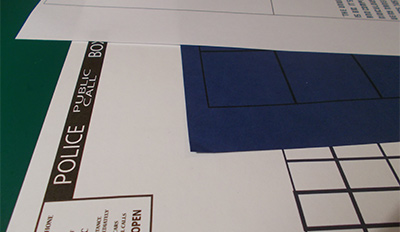
Also note: Cut the "Police Public Call Box" sign exactly in half, as one half goes on one door, and the other and the other door.
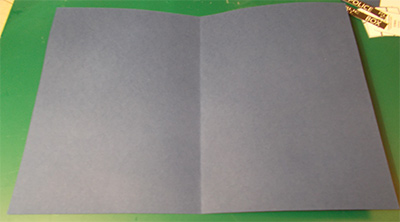
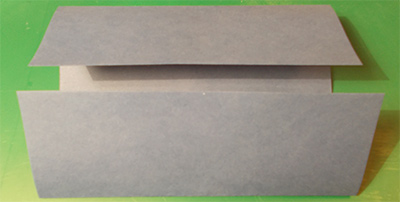
Once you have all the smaller pieces sorted, grab the blue A4, and fold it in half cross-wise. Then fold it open again, grab one side, and fold it up to the fold in the center. Repeat with the other side, and you should now have the basic folding door structure.
You can skip the first step and instead measure the center to avoid the center fold, but I personally enjoy having that fold, as it makes the end result stand a little more rectangular, like the tardis itself.
Grab a pencil and ruler, then measure and draw the top of the tardis on the doors of the card, like in the image below.
You can be as exact and true to life as you wish, but I took some artistic liberties. The actual tardis, in all of its versions, has more steps at the top, and of course protruding parts at the top and bottom. But those protruding bits can make the card really flimsy, so I recommend leaving those out.
I've added my measurements to the image below.
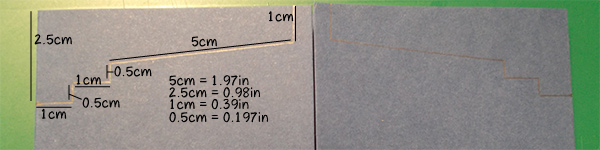
Now cut out the top part to create the tardis look. I highly recommend using a hobby knife and ruler for this, it makes it a lot easier. When you keep the card folded, you can simply slice through two layers of paper, and both sides will look the same. With scissors things can slide a little, and it's more difficult to reach the smaller corners. Definitely possible though, just take it slowly, or measure, draw and cut the pattern on the back of the card as well.
Now all there's left to do is glue all the smaller pieces from earlier in their correct spots. Again, you can be as precise and true to life as you wish, or just eyeball it a little like I did. I found it easiest to first stick the "Police Public Call Box" sign on the doors. I did it by first aligning the edges of one half of the sign to one door, holding it there with my finger (you could use a small clip), then gently lifting up the other side, putting glue on it, then gluing it to the door. Then afterward glue the other side of the sign to the door as well, and repeat these steps for the other door.
Now all there's left is the panels and windows. I measured how much space I had left on the doors, then subtracted 16cm (4 squares on a door, each 4x4cm). If you want to be really precise, divide this number by 5, and whatever that number is is how much space you'll want between each panel. However, if you want to be even more precise and true to life, remember that on the tardis there's a fair bit of space left between the bottom panel and the bottom of the tardis, as well as the top panel and the "Police Public Call Box" sign, so the space between panels could be shortened to mimic this.
Gently stick them all on, stick the folding contraptions on the inside, and you're done! Repeat everything with different messages on the inside, and you'll have personalized cards for all your Whovian friends they have probably never received before.